Note: this article is a translation from French of the excellent article written by Stéphane on his Folo blog. There are already a few articles on this topic on the net but Stéphane post is well illustrated and simple.
Of course, cleaning your camera sensor can be a dangerous operation and I cant be responsible of the result. Do it at your own risk.
Start of article
This tutorial will show you a simple, safe and cheap way to clean your DSLR sensor. The technique shown here is much safer than some others, reliable and used by the author plus many other pro photographers. Of course, there are no warranty of success since a bad execution of the procedure could result in damage to the camera.
If you take your time and do it in a relaxed mindset, you should be fine. You can also ask a professional to do it in case you are scared. The advantage of doing it yourself is that you can clean your sensor outside of normal business hours, just before an important shoot.
Before starting with the procedure, lets make something clear: we are using the term ‘sensor cleaning’ but in fact we are not cleaning the sensor it self, we are cleaning the protective filter which is on top of the sensor.
Note from Alain: If you ever happen to damage the filter, it cost about 400$ to replace according to the repair center I have contacted.
What you will need:
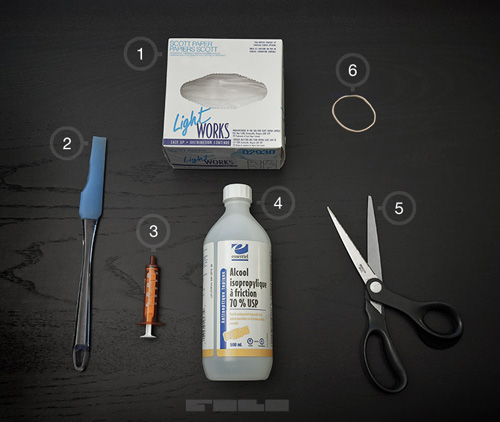
1)A box of laboratory grade paper: about 7$ for 280 sheets.
This kind of paper has the property of being non abrasive and does not leave residues on the cleaned surface. As its name imply, it is mostly used in laboratories to clean microscopes and can also be found in camera stores are lens cleaning paper.
2) Cake icing spatula: 5$
The most important tool, you might have to look around to find a suitable one. Forget the cheap ones from the dollar stores and pick one that is flexible enough. Also make sure that the part holding the rubber section to the handle is not too wide (as the one in red in the picture bellow).
Once you have your spatula, you have to cut it to a width of 14mm for full frame sensor or 11mm for cropped sensors (Note: you can pick the width you want, the author suggested these number based on his experience).

3) graduated syringe: cheap
Pick one at your local drugstore.
4) a bottle of isopropyl alcohol 70%: 8$
At the local drugstore again.
5) scissors
6) rubber bands
You can also use medical gloves, just make sure to pick the ones without powder.
Step 1: Examine the sensor
This is easy. Create a white background in Photoshop then display it full screen. Set the aperture of your lens to its smallest value (ex: f32) and take a few shots.
Note from Alain: You can shake the camera as much as you want, it wont change anything since the sensor is only capturing the white background.
The next step is to process the RAW: increase exposure if needed, remove saturation and boost contrast. You should see some dust particles as in the picture below.

Step 2: Prepare your tool
Cut the paper in a squarish shape and fold the two opposite corners to form a triangle. Put the edge of the spatula at the fold line (picture 2) then fold the left and right sides over each others to wrap the spatula (pictures 3 to 5). Finally, put the rubber band in place to hold everything (picture 6).

Step 3: Preparation of the working area
Install your camera on a tripod, facing up, and make sure to have a good light source over it so you can see the sensor. Of course, it is also a good idea to make sure the light source is clean and wont have dust particles falling onto the sensor once you remove the lens!
Read carefully the next steps, the order is critical.
Before moving forward, it is a good idea to verify that your battery is at full charge. If the battery would happen to run out during the operation, you might damage the mirror while it is returning to its initial position.
Now hold the spatula in a upward position and use the syringe to put a single drop of alcohol on the top of the paper. Lets make it clear: use a single drop! If you put too much liquid, you run the risk of damaging the sensor by having the alcohol run between the IR filter and the sensor. Someone else made the mistake, so you have been warned!

While the paper is absorbing the liquid, activate the sensor cleaning function and remove the lens. By the time you are ready, the paper should be covered with alcohol.
Step 4: The Operation!
You are now ready to clean the sensor. It is important to only do a single pass with which paper. Any subsequent passes would only contaminate zones that have already been cleaned.
The picture below shows the path you should follow with your tool. Start at point 1 and move toward point 2. Once there, do not rotate the tool, keep a straight line and go to point 3. You then repeat the same steps to go from 3 to 4 then return to point 1.
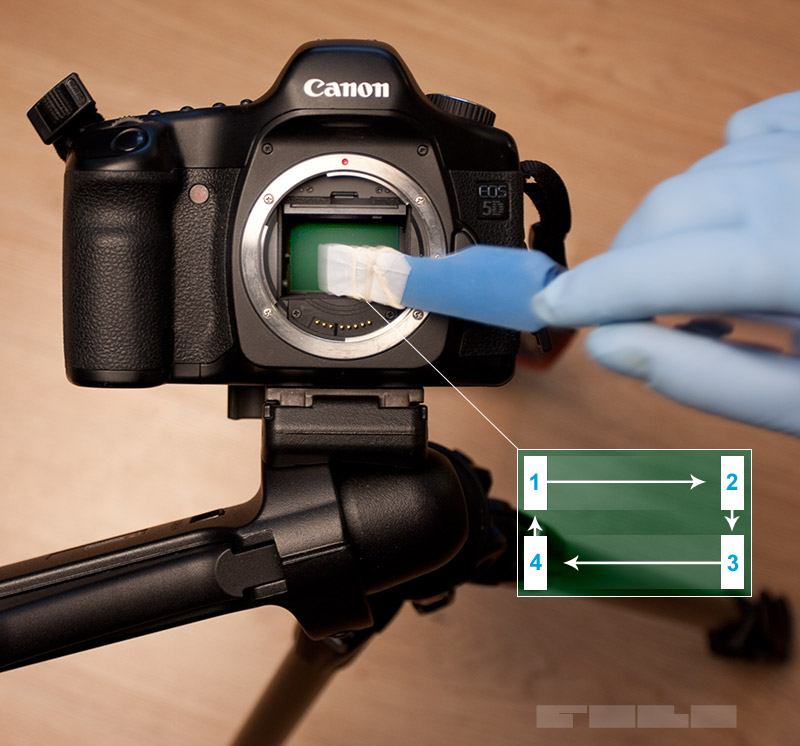
Once you have completed your passes, turn the camera off and put the lens back on.
Step 5: Verification of the results
It is time to go back to step 1 and examine the sensor again. While it is probably much cleaner than before, it might need another 1 or 2 passes. Do not go above that. If the sensor is still dirty, let it go for now. The dust is probably going to go away the next time you clean it. Also, do not expect your sensor to be perfectly clean, there are always some dust spots left. It is ok, the important thing is that you improved the overall situation.
Here is the final result. While there are some dust spots left, they are minimal and easy to fix in post production.

Summary
- Take your time. There is no rush, be zen about it!
- Make sure the battery is fully charged
- Do not touch the paper before before using it
- One pass per paper, no more!
- Only use one drop of alcohol.
Many stores sell cleaning kit. They are expensive and wont get you better results than the technique described here.
And of article
Thanks to Stéphane for allowing me to repost his article here. I have a few more article to translate in the next few weeks and I am always looking for more. So if you are a French blogger and would like me to repost your article here, just contact me.
As suggested by David in the comments, you can buy all of the items mentioned above from Amazon in the Digital Survival KIT. It is a bit more expensive but still ridiculously cheap compared to sending your camera to the store.
 Canon5Dtips Photography is more than words.


