This part 2 of Jon Lightroom 3 review. You can see the introduction in is first post.
Import Dialog
One of the first things you’ll notice about LR3 is the new import Dialog, which is largely different than previous versions. The simple dialog box of old is gone and replaced with a full screen window complete with a large preview area. The preview area is the most significant improvement- you can now preview images and video before importing and can un-check any you don’t want to ingest- a nice feature (and overdue!). However, in exchange for a more sophisticate import dialog we are also given a slightly more complex interface, with essential source and destination information on opposite sides of the screen. This can make a normally simple task of simply importing, renaming, and adding metadata, cataloging and backing up a little more tedious. It also doesn’t help that they’ve now included a few seemingly unimportant options for these tasks, for example the rename images by shoot in addition to custom name. In other words, LR3 will add the words “shoot_whateveryouwant-1”. It would be just as easy to do this with a custom name, and with this option they’ve just made the list unnecessarily longer. Another annoyance of the new import dialog is that you will get it when importing ANY new images, even simply updating a folder. This essentially creates an extra step in the workflow, i.e. importing tiffs or psd back into LR after they’ve been processed in Photoshop. For photogs who require speed and consistency and are used the efficiency of previous versions of Lightroom in this regard may be surprised when they find themselves being slowed up by these little nuances of the new import dialog.
Support for Video
Anyone who followed the beta releases of Lightroom 3 closely knows that video support has been a contentious issue among many Lightroom advocates. On the one hand, you had the Lightroom is for photography only crowd and those who basically wanted as much support as possible for video, the more the merrier. It became quite a hit topic on Adobe’s feedback forum about the beta software.
Whether because of the outcry of the “don’t mix my ham with my eggs” crowd or a strategic reason, Adobe decided to provide limited support for video. You can import, play (albeit by opening in QuickTime), rename, and achieve all of the other tasks that the Library module can provide. You can’t export in any format other than the original, and can’t utilize any feature or tool from the rest of Lightroom. While it’s nice that Lightroom at least provided this pea size amount of support- they really dropped the ball in my opinion by not providing expanded support. While adding editing support features like trim, cut, etc might not make sense for adobe to include (no one expects them to replace Final Cut or Premier anytime soon) it would be really something if the tools from the develop module, the plug-in, the entire LR arsenal in including web publishing were supported. Add a QuickTime-based export engine to allow for encoding and exporting to a variety of formats and you have a video powerhouse. This is where LR could really fit into the workflow of the videographer, if Adobe chose to do so. Hopefully we will see more of a push in this direction in the future. Until then, don’t expect LR to be an integral part of any video workflow.
New Publish Services
Normally I wouldn’t consider the ability to publish images directly to Flickr an update worthy of mention, but there’s a couple of other additions to the interface that do warrant coverage. Yes, you can now publish images directly to your flickr account and manage those images (updating, erasing, adding, etc) directly from lightroom. The real hidden gem here though is the local publishing option, which can be an extremely valuable if your managing some other hosting service or product from your hard drive. For example, let’s say your using a plug-in like SlideShowPro for Lightroom or flash (a very cool slideshow generator I’ll be covering in a future review) and you are using an xml file to populate your photo galleries. With the publish to hard rive option; Lightroom will track in real time the updates to your images you’ve put in a specific folder for such a slideshow. This means anytime you want to change the list of images in a destination, Lghtroom will keep track and publish these changes .In addition to Flickr and local hradrive publishing, there are many plugins available online for various phot hosting services like Zenfolio, Snapfish, Photobox and others that can be installed and made available. The best place to find these as well as countless other plugins for Lightroom is at the Adobe Lightroom Exchange.
Tethered Capture
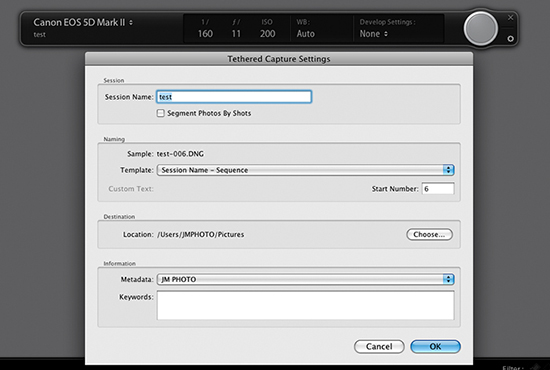
Lr3 largely streamlines the tethered shooting process by including a built in tethered capture option for Nikon and Canon cameras. This is one of my favorite new features in LR3 because it actually increases the speed and productivity of your workflow rather than getting in the way. In previous versions of LR, the lack of a tethered capture option meant that images had to be captured via the camera makers proprietary capture software (canon photo professional or Nikon Capture) then imported into Lightroom via an automatically updated folder.. The only efficient way to do this was set up LR’s auto update feature to watch the folder being used by the capture software, and automatically import into the library. Not only was this method pretty cumbersome, but took about twice as long from capture to import. It also had the issue of potentially importing and renaming images twice, once through the capture software and then again in Lightroom. This meant there was a chance that if you didn’t set it up correctly; you could end up with two sets of the same images in different locations.
LR3 effectively eliminates these issues with the it’s new tethered capture option. It’s available via the file menu and therefore while using any of the modules. The initial setup provides for renaming, adding metadata, location; the basic LR import MO. The actual capture interface is a simple, clean and highly streamlined window that gives information of the camera/lens model, and basic shooting settings (aperture, shutter speed, iso, white balance) The main caveat is that you cannot change any camera settings in Lightroom, only pull the shutter. The capture button will initiate auto focus, which is essential if they’re including the option for remote firing. Any changes to camera settings will have to be performed in camera. This is where the LR tethered option differs from the camera maker’s software, where you would have full control over most (if not all) camera settings within the software. However, I personally enjoy the simplicity and straightforwardness of the new tethered option and most importantly- it’s MUCH faster than going from camera software to light room. Again, MUCH faster, I would say probably 50-100% increase here. So, in exchange for not being able to change camera settings in LR (which I wouldn’t have used anyway) we get a much a faster and streamlined interface and get to get rid of the “middleman” camera’s software. In short: I’ll take it
 Canon5Dtips Photography is more than words.


