Working on the Genie review, thus not writing articles recently, as I’m on the field a lot. I ran into a little issue, while wanting to make HDR Timelapse from RAW images.
I made 300 images for a short scene of bigger movie to come, 300 RAW files.
I know I have couple of options: convert each and every image to JPEG -2, 0, 2 exposures using Photoshop Lightroom or just load images to Photomatix Pro and use Batch Single Photos on RAW images.
Lets see which one is less time consuming.
Convert RAW files to JPEG using Lightroom
First question I would ask would be, “Can I make Time-Lapse straight from the Lightroom?”. Answer: Yes, you could, but it would not be HDR TL.
First advantage I see right away is, that you can edit footage. Don’t over do it – make simple adjustments as you like. What you must do is make -2, 0 and 2 exposures, so you basically make 3 photos from one RAW file. You can even make more (as Lightroom Exposure slider goes from -5 up to +5), but we will stick to the default 3 images HDR.
Steps to do it:
Preparing images for Photomatix in Lightroom
- Import your RAW images in Library module
- Go to Develop Module
- Edit first image in the sequence by your liking
- Crop image with 16:9 ratio (important if you want Full HD resolution)
- Do -2 exposure (it doesn’t have to be -2 Exposure setting in LR, best way to do it is to slide Exposure slider to the left and look at the Highlights until they are normally exposed, then sync those settings to whole batch)
- Select all images in the sequence and Sync with all check box selected (Even Crop)
- Export images, best thing would be to add prefix or suffix so you know it is -2 exposure. Don’t forget the re-size option pick (1920×1080 > important re-sizing option but only if you cropped in 16:9 format, otherwise you’ll get 1920×1280 resolution)
- Don’t close LR, press “Command” on the Mac or “CTRL” on PC, and deselect first image, then click it again to select just first image
- Repeat process from step 5. but leaving Exposure in the middle, meaning, normally exposed image, where you have correct Mid-tones exposed
- Repeat process from step 8. and make all from step 5. for last, +2 exposure, where you expose shadows and you are done with 3 differently exposed images
While you export one exposure, you can edit your first photo and adjust it for next exposure, sync, but wait for first batch to complete. Check if final photos are all a like, then Export 2nd batch, different exposure.

Note: Step 5. is rather important for final look of your HDR, I recommend that you make 3 exposures (-2, 0 and +2) from first image and load those 3 images into Photomatix, and see if you made it right. It all depends on your desired effects. I like more natural HDR look, but some people prefer the ‘unreal’ HDR look.
Time needed to export all 3 exposures was around 40 minutes.
Photomatix steps
- Open Photomatix
- Click Batch Bracketed Photos
- Select Tone Mapping
- Select desired Preset or in case you don’t have desired Preset, make your own on first 3 images (-2,0,2)
- Select output options
- Click Run
Time for compiling HDR images, was around 40 minutes.
Adobe After Effects or any other desired program to finalize Time-Lapse
I use AAE to make TL:
- Open AAE and Create New Composition
- Click on File Import -> File
- Select First image and check Import as: Footage and JPEG Sequence
- Click Open
- Drag your JPEG Sequence to your Composition
- Click Composition -> Add To Render Que
- Change output settings as desired, do first one in lower quality, I pick H.264, bit-rate 6, 24 fps
- Click Render
Time: Less than a 2 minutes.
Overall time around 1:30h to get to Full HD 1920×1080 10 seconds time-lapse.
As I made this TL just for test purpose, I’m not completely happy with results this way, TL quality is good, but not perfect.
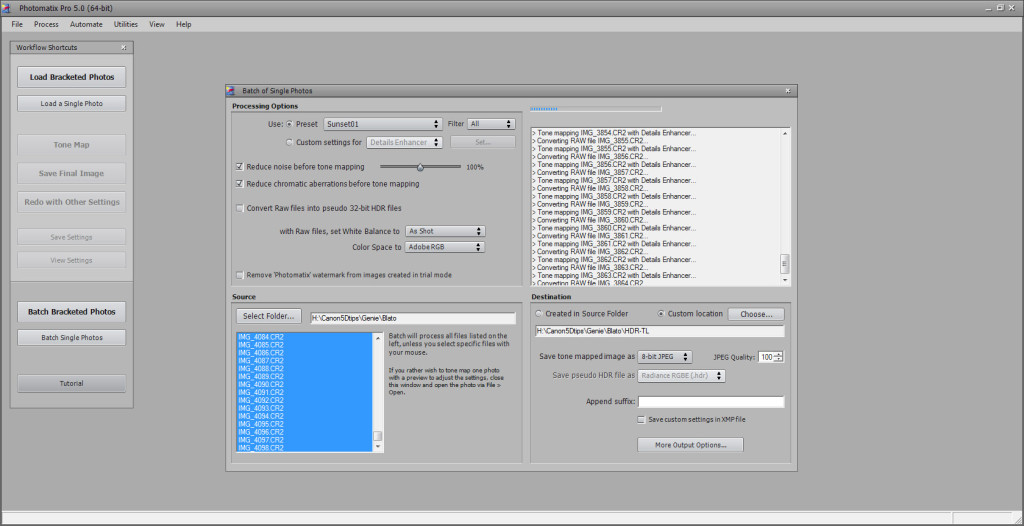
Directly making HDR Timelapse from RAW images
Sounds faster, huh? Well I thought so, but it wasn’t.
Advantages?
One obvious advantage:
– simplicity > just load RAW files, run Batch and voila after 4 hours or so, you have your HDR images ready for TimeLapse
List of downsides:
– until new Photomatix Pro 5.03 you were not able to resize images, at least I didn’t find that option
– re-sizing images from original down to 1920×1280 didn’t have impact on process speed as whole Batching and converting to HDR is made in Photomatix on RAW files
– time consuming > making 3 exposures in LR is at least two times faster process than doing HDR directly from RAW in
Photomatix
– No editing > directly from RAW to HDR without editing, simple and easy, but time consuming

After 1:20h, Photomatix processed 98 pictures, and still 200 left, what means that this batch would take approximately 4 hours for 300 images to complete.
Conclusion: JPEG vs RAW?
 Canon5Dtips Photography is more than words.


